Coolermaster Cool Viva VHC-L61
Value For Money
Coolermaster Cool Viva VHC-L61
When you purchase through links on our site, we may earn an affiliate commission. Here's how it works.
User Reviews
Value For Money
I Only Wanted To Replace The Fan On My Xpertv
I only wanted to replace the fan on my Xpertvision GeForce 6600 128 MB DDR3 as that tiny thing creates more noise than all my other casing fan/psu fan/cpu fan combined. I could not find any low cost option so I went for Coolermaster CoolViva. It cost me only USD13.00. Definitely the cheapest aftermarket VGA cooler I could find. The other more "popular" brands cost many times more. With such a low price, I was prepared to just junk it if it does not meet my objective. I was not looking for improved cooling as I am already getting a decent 42 degC at idle and 57 degC at load with the stock HSF. I live in a very warm country and furthermore, I have overclocked my graphics card quite aggressively!
An issue began long before I even bought it. At the time of writing this, there is ZERO official information on the compatibility of CoolViva with different graphics card model. The seller told me CoolViva won't fit on my PCIe GeForce 6600, but I went ahead to buy it anyway as I remember seeing an article on the Internet showing a GeForce 6800-CoolViva combo. The seller was fortunately proven wrong. It can be installed on my Xpertvision GeForce 6600 128 MB DDR3. The compatibility of the motherboard is another matter altogether and may be the more important factor why this card is NOT suitable for everyone
Removing the stock heat sink and fan from my card took less than 10 seconds (serious, it was that easy on my card!). Cleaning away every single trace of the old whitish thermal paste using pure alcohol swab took me another 5 minutes. I had to clean it away as I wanted to use Artic Silver 5 thermal paste. You should not contaminate the thermal paste if you intend to use Artic Silver.
The actual installation of CoolViva itself was not too difficult for someone who is comfortable doing DIY mods but it is nevertheless still very time consuming. It took me about 30 minutes to install it, this includes the time I took to clean away the mess associated with thermal compound application. A second pair of hand to help hold on to the parts while you screw them together would be very useful. I have used Artic Silver 5 thermal compound (not supplied) between the GPU core and the aluminum block. For the rest of the interface, I used the supplied white thermal compound.
One major defect on my set was the fan frame. The centre of the frame presses on to the fan. The fan won't spin. I had to cut away the plastic centre frame. The centre frame does obstructs the flow of air so maybe it is better without it anyway. The second defect is the slightly bent heat pipe. My advice is do not attempt to bend it back into shape, you may make it worse. It is actually very malleable. I suggest you proceed to install the heat pipe as shown in the instruction even though it is slightly bent. The process of screwing the blue heat sink into the aluminum block actually compresses the heat pipe into the groove and hence back into shape.
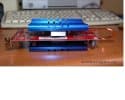
The size of the two blue heat sinks causes significant obstruction to my Asus P5LD2-SE motherboard. (for those who have not seen the CoolViva image, there are big blue heat sinks on the same side as the GPU core and one on the side without the GPU core, both are connected thermally by the heat pipe) Firstly, it is too close to my Northbride heat sink. I am unable to install the CoolViva fan on that side. You can either choose to install the fan on the opposite side or not install it at all. I have installed it on the same side as my GPU core, therefore making my PCI slot beside the video card totally unusable. Secondly, the blue heat sink protrude into the space for my 3rd and 4th memory module slot. Fortunately I use only one memory module and I placed it on the 1st memory slot. For dual DIMM configuration, I was told you need to actually install it on slots 1 and 3 as a pair. This configuration is therefore out of the question for me now.
Because of the hefty weight (I think it weighs about 0.5 kg), it is better to use a screw to secure your card rather than depend on your "tool-less" snap on device. If the graphics card with the CoolViva were to dislodge suddenly during moving, it could do some serious damage to the neigbouring components.
In conclusion, CoolViva has met my immediate objective, i.e. to replace my noisy stock fan. I am now very happy with the overall noise level of my PC. The fact that I get 3 or 4 degrees improvement in the temperature at full load is a bonus. Does it mean I can overclock my graphics card a little bit more now? I will try it out later once my Artic Silver 5 thermal compound has been subjected to 200 hours of cyclic operation as recommended. But on the other hand, I had to give up two memory slots and the neighbouring PCI slot. Was it worth it? I think not, at least not with the motherboard I am currently using. I do not have a need for the neighbouring PCI slot or the memory slot for the time being, but I won't hesitate to dismantle the CoolViva when that time comes. I would then just re-install back the stock heat sink but minus the noisy stock fan. I would instead use 4 short length of thin aluminum cables to strap a silent 60mm fan directly above the stock heat sink. If I want to further minimise the height, I could use the super slim and silent CoolViva fan for this purpose instead. There are 4 screw holes already provided on the stock heat sink and can be used to strap a fan above it.
Value For Money
In A Word The Coolermaster Cool Viva Vhc-l61 Heats
In a word the Coolermaster Cool Viva VHC-L61 heatsink is breathtaking. I installed this on my AGP Asus 6600GT and it took me about 45 minutes to install it; which, looking at similar products, seems to be pretty good.
Br>I am running this without the fan so it is totally silent, and the performance is amazing! It actually beats the stock cooler with its in-built fan!!! Idle temperatures are about 35 - 40 degrees C, and under load temps are about 65 degrees C, which is amazing considering it is passively cooled. With the included fan this thing would be an overclockers dream, and what is better is that this cost me £15 inc p&p, and considering that a Zalman costs a tenner more before postage, this item is a total gem!!!!
Q&A
There are no questions yet. Be the first to ask a question.